
English Manual
Page 2
...ab strap while weights are exercising, stop immediately and begin cooling down. 8. Inspect and tighten all times. Make sure the cables remain on all instructions in this product. 2 The home gym is intended for foot protection when exercising. 4. It is ...or institutional setting. SEARS assumes no responsibility for protection. 11. Table of Contents Important Precautions 2 Before You Begin 3 Assembly 4 Cable Diagrams 23 Adjustment 25 Trouble-shooting and Maintenance 26 Weight Resistance Chart 27 Ordering Replacement Parts Back Cover Full 90-day Warranty Back Cover...
...ab strap while weights are exercising, stop immediately and begin cooling down. 8. Inspect and tighten all times. Make sure the cables remain on all instructions in this product. 2 The home gym is intended for foot protection when exercising. 4. It is ...or institutional setting. SEARS assumes no responsibility for protection. 11. Table of Contents Important Precautions 2 Before You Begin 3 Assembly 4 Cable Diagrams 23 Adjustment 25 Trouble-shooting and Maintenance 26 Weight Resistance Chart 27 Ordering Replacement Parts Back Cover Full 90-day Warranty Back Cover...
English Manual
Page 11
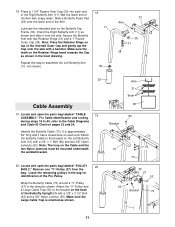
... the direction shown. Lubricate the indicated axle on pages 23 and 24. Note: The loop on the back of the Pro Pulley. Remove one "V"-Pulley (27) from the bag. Wrap the Butterfly Cable (73) around a "V"-Pulley (27) in the bag for identification of the Butterfly Upright (1) with a 3/8" x 2 1/2" Bolt (...73 32 27 53 50 Bracket 73 1 Secure the Butterfly Arm with soapy water. Attach the "V"-Pulley and a Large Cable Trap (32) to the Cable Diagrams and Cable ID Chart on the Butterfly Top Frame (33). Repeat this step to the bracket on the Retainer Rings bend towards the...
... the direction shown. Lubricate the indicated axle on pages 23 and 24. Note: The loop on the back of the Pro Pulley. Remove one "V"-Pulley (27) from the bag. Wrap the Butterfly Cable (73) around a "V"-Pulley (27) in the bag for identification of the Butterfly Upright (1) with a 3/8" x 2 1/2" Bolt (...73 32 27 53 50 Bracket 73 1 Secure the Butterfly Arm with soapy water. Attach the "V"-Pulley and a Large Cable Trap (32) to the Cable Diagrams and Cable ID Chart on the Butterfly Top Frame (33). Repeat this step to the bracket on the Retainer Rings bend towards the...
English Manual
Page 23
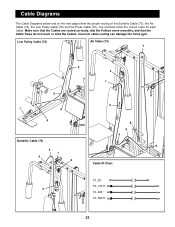
Low Pulley Cable (75) Ab Cable (74) 7 3 3 1 2 2 1 4 5 8 5 4 Butterfly Cable (73) 6 4 1 5 2 Cable ID Chart 73, 52" 75, 143.5" 3 74, 224" 72, 389.5" 23 Cable Diagrams The Cable Diagrams below and on the next page show the correct route for each Cable. Incorrect cable routing can damage the home gym. Make sure that the Cables are routed correctly, that the Pulleys move smoothly, and that the Cable Traps do not touch or bind the Cables. The numbers show the proper routing of the Butterfly Cable (73), the Ab Cable (74), the Low Pulley Cable (75) and the Press Cable (72).
Low Pulley Cable (75) Ab Cable (74) 7 3 3 1 2 2 1 4 5 8 5 4 Butterfly Cable (73) 6 4 1 5 2 Cable ID Chart 73, 52" 75, 143.5" 3 74, 224" 72, 389.5" 23 Cable Diagrams The Cable Diagrams below and on the next page show the correct route for each Cable. Incorrect cable routing can damage the home gym. Make sure that the Cables are routed correctly, that the Pulleys move smoothly, and that the Cable Traps do not touch or bind the Cables. The numbers show the proper routing of the Butterfly Cable (73), the Ab Cable (74), the Low Pulley Cable (75) and the Press Cable (72).


